![]()
Driving the deformation
![]()
Deformation may be driven in many different ways that fall into three basic categories:
The choice depends very much on the problem at hand.
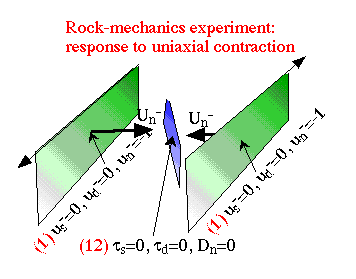
Example 1: Simulating a rock mechanics experiment in uniaxial contraction. Here the deformation is driven by specifying code 1 conditions (absolute displacements of the footwall along each component of the element) on elements in the far-field relative to the internal fault-element (see figure below). The conditions below state that the footwall (or 'minus' side) of each far-field boundary element will move 1 cm along the negative plane-normal axis and 0 cm along other component axes (planar coordinates). Inside and about to be squeezed by the far-field boundaries is a single fault-element whose boundary conditions are code 12 (shear stress along strike, down dip, and normal stress normal to the element), all set to zero. Code 12 is a commonly used condition for allowing the element to slip freely in shear but to disallow its opening.
![]() We recommend that you always check that you've
correctly oriented the strike directions and corresponding 'minus'
sides for the absolute displacements specified by placing a small
inspection plane very close to and parallel to each driving element;
the displacements on this inspection plane should equal the
displacement value you specified. Note that there can be some numerical
error for absolute displacement boundary conditions because the Green's
functions are not single-valued on an element and the normal distance
goes to zero (see Okada, 1992). Thus, another reason to check each
driving element separately is to be sure it is numerically doing what
you think it should be.
We recommend that you always check that you've
correctly oriented the strike directions and corresponding 'minus'
sides for the absolute displacements specified by placing a small
inspection plane very close to and parallel to each driving element;
the displacements on this inspection plane should equal the
displacement value you specified. Note that there can be some numerical
error for absolute displacement boundary conditions because the Green's
functions are not single-valued on an element and the normal distance
goes to zero (see Okada, 1992). Thus, another reason to check each
driving element separately is to be sure it is numerically doing what
you think it should be.
![]() Note that the stress boundary conditions placed
on the central element via code 12 are ending conditions. That
is, the stresses take the zero values at the end of the model run, and
displacements that occur across the element do so in order to preserve
the zero stress conditions. In other words, the element behaves like a
frictionless fault. To simulate friction on the element, you
would need to impose a non-zero level of shear stress opposite in sign
to that imposed by the driving stresses. This is leads to complications
of having to assume a priori slip directions, which we will
discuss elsewhere.
Note that the stress boundary conditions placed
on the central element via code 12 are ending conditions. That
is, the stresses take the zero values at the end of the model run, and
displacements that occur across the element do so in order to preserve
the zero stress conditions. In other words, the element behaves like a
frictionless fault. To simulate friction on the element, you
would need to impose a non-zero level of shear stress opposite in sign
to that imposed by the driving stresses. This is leads to complications
of having to assume a priori slip directions, which we will
discuss elsewhere.
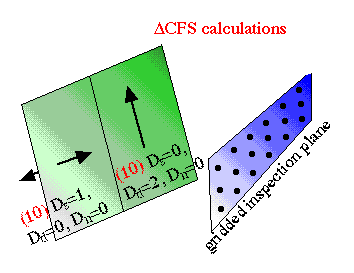
Example 2: Change in Coulomb Failure Stress calculations. A powerful application of boundary-element codes is the calculation of the change in the so-called Coulomb failure function. In the simple example shown below, the slip of a fault-element (in green) is driven by the specification of relative displacements along each component axis. For illustrative purposes, the fault slips 1 cm only along the strike on the left side and 2 cm only along the dip on the right side. A gridded inspection plane might mark the location of another fault on which you want to calculate the change in Coulomb stress due to this slip distribution.
![]() Note that this is an example of using 3d~def as a
dislocation program rather than a boundary-element program. Since all
the relative displacements are fixed a priori there is
nothing to solve for. This slip distribution need not minimize the
strain energy (if a regional driving deformation field were added) and
the effect of slip on one half of the fault on the other half is not
accounted for.
Note that this is an example of using 3d~def as a
dislocation program rather than a boundary-element program. Since all
the relative displacements are fixed a priori there is
nothing to solve for. This slip distribution need not minimize the
strain energy (if a regional driving deformation field were added) and
the effect of slip on one half of the fault on the other half is not
accounted for.
Example 3: Regional strain field. Here the single fault-element has code 12 boundary conditions, each set to zero, and deformation is driven by specifying a far-field regional strain, in this case a simple shear oblique to the fault-element. A simple shear would be specified by a displacement gradient tensor.
![]() Displacement boundary conditions take precedence
over a uniform regional background field, which means that the
specification of the latter will not effect displacement on elements
for which a displacement boundary condition is specified. You can,
however, mix a uniform background field with displacement conditions on
some of the elements (e.g., allowing the remaining elements to slip to
a stress boundary condition): regional boundary conditions are simply
added to other stress boundary conditions on subelements. See the manual for details.
Displacement boundary conditions take precedence
over a uniform regional background field, which means that the
specification of the latter will not effect displacement on elements
for which a displacement boundary condition is specified. You can,
however, mix a uniform background field with displacement conditions on
some of the elements (e.g., allowing the remaining elements to slip to
a stress boundary condition): regional boundary conditions are simply
added to other stress boundary conditions on subelements. See the manual for details.
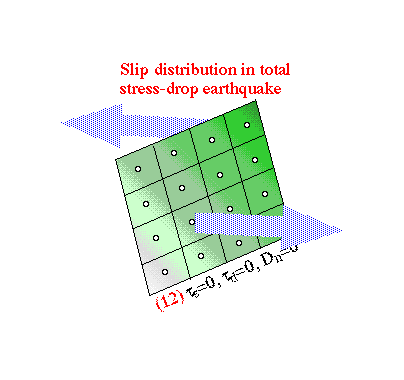
Example 4: Strain channels. Slip on faults in the seismogenic brittle crust may be driven by continuous slip in the ductile layers below. This may be simulated using a 'driving' fault at depth with specified slip beneath a fault that is allowed to slip in response to the deeper slip. The driving fault should be much larger than the shallower fault to avoid any end effects. Here we specify boundary conditions on the shallow fault that will permit a total stress drop earthquake and no fault-opening. Since there is no time-scale, this corresponds to the condition at the end of the seismic cycle just after an earthquake has occurred.
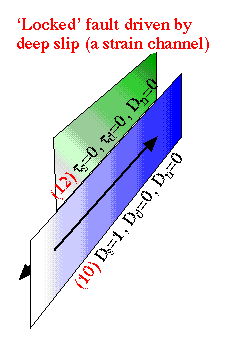
![]() Note that although a strain-channel or deep slip
may occur in a wide zone, in such a model as this, the bottom of the
shallower fault must be colinear with the top of the driving fault to
insure cancelation of singulaties along the element edges.
Note that although a strain-channel or deep slip
may occur in a wide zone, in such a model as this, the bottom of the
shallower fault must be colinear with the top of the driving fault to
insure cancelation of singulaties along the element edges.
![]() Although the user can specify an asymmetric
displacement gradient tensor to drive a regional deformation, the
asymmetric part (the rigid-body-rotation tensor) does not affect the
calculated relative displacements, because of course the rotational
part of the tensor does no work.
Although the user can specify an asymmetric
displacement gradient tensor to drive a regional deformation, the
asymmetric part (the rigid-body-rotation tensor) does not affect the
calculated relative displacements, because of course the rotational
part of the tensor does no work.
![]()