Unix Basics 1
As discussed in the first lecture, analyzing data often requires several different tools that you must string together and run on a large number of data files. This would be tedious if done by hand, and you are very likely to make a mistake. The Unix shell is the tool that is most commonly used to tie together different tasks. I use a Unix shell every single day, much more often than any other tool that we will be covering in this class, and thus it is very important to develop your Unix skills.
We often have to interact with the operating system to get the computer to perform some task. In many cases, this task is not particularly straightforward without a large amount of work on your part. Let’s say that in your research, you are detecting and locating earthquakes, and have some computer code that analyzes a large number of waveforms that you automatically download from the internet every day. To do this efficiently, you would need to figure out which files on your hard disk include new waveform data, and process only those data files. To do this manually, you would need to look through potentially hundreds to thousands of files to find the few newest ones, and then manually type all of them into some file to analyze those files. That would be extremely time consuming, and you are also likely to make some sort of typing error in the process, or miss some new piece of data.
Instead, what would be ideal is to be able to tell your computer to find all of the files in the folder where you keep your waveforms that were created in a certain time period (say, since you last performed your analysis), and then feed those into your code to do the analysis. Computers are very good at doing such rote tasks quickly and efficiently; we just need to know how to explain to the computer what we are trying to do. This is not easy to do on a Windows computer or within the operating system GUI on a Mac or a Linux machine, but it is very possible (notice that I did not say easy!) using the Unix command line.
In addition to my notes on Unix, I have included a link to a book on the course website that provides an introduction to using the Unix terminal on Mac OS X. You should read through both of these before coming to class, and be ready to spend the class time playing around with the shell to start getting comfortable.
Unix Philosophy
The Unix family of operating systems originated in the late 60’s/early 70’s at AT&T’s Bell Labs. Since then, many different versions have been developed that are very similar (but not exactly alike), including BSD Unix (developed at Berkeley in the 70’s), Sun Solaris (now owned by Oracle), and the various flavors of Linux. The Mac OS is a descendant of BSD Unix, while some of the other Unix-like operating systems that you are likely to encounter (Sun, Linux) broke from the original Unix system at different points. This means that there are usually slight differences between the operating systems in terms of the specific commands. However, the “Unix Philosophy” is generally the same across these operating systems and the differences usually involve only slight tweaks to the command syntax.
Put broadly, the “Unix Philosophy” is one of modular commands that are designed to do just one simple, well-defined thing and to do it well. If we need to do something different, rather than modify that original command, we start from scratch and make a new command, and then have some way for the two commands to interact so that we can string them together and perform a task. This is in contrast to Windows (and the GUI-side of Mac OS), where the operating system has been designed to help even the novice user perform simple tasks. Because the Unix commands are not simple and obvious, it has a much steeper learning curve than using a system like Windows – in Windows, the smarts are stored in the OS, while in Unix the smarts are stored in the user. It has also been said that “Windows makes easy tasks easy; Unix makes difficult tasks possible.”
Unix systems are multitasking and multi-user (note that any user can use any computer in the Mac Lab, and the machines have no trouble performing more than one task at a time). Originally, the only way that the user could interact with the operating system is through the command terminal (either a teletype where you typed commands and then a printer printed out the response or a single terminal window on a monitor), but most Unix systems these days have at least a file system browser that shows you the filesystem graphically. However, when you connect to a computer remotely, you still need to do so using a terminal. You may occasionally have a problem with your computer and need to boot in what is known as “safe mode” where you only can access your machine through a terminal. This means that knowing how to do everything in a terminal is a must for any Unix user.
Browsing the Filesystem
Enough about philosophies and history: how do we use a Unix Terminal? Open the terminal and type pwd followed by a carriage return. The terminal should print out /gaia/home/<username>/. This is what is known as your home directory (or folder), and by default your new terminal sessions start in this directory. The command pwd is the Unix command that tells you the current working directory (pwd is short for Print Working Directory). Note how the command follows the Unix philosophy: it does only one thing.
Unix uses a hierarchical filesystem. The topmost directory is what is known as Root, and all other directories fall into a place within the hierarchy, illustrated below (note that this isn’t complete, it just illustrates the big picture):
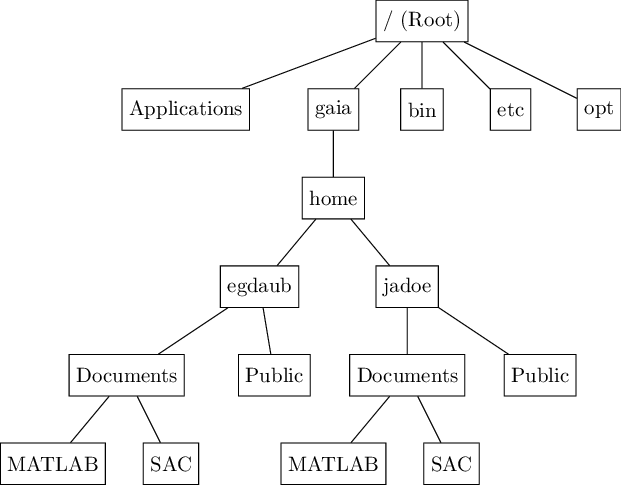
Note that in the directory /gaia/home/ there are multiple directories, with each directory corresponding to one user. This highlights the multiuser nature of Unix: every user has their own space to store things. We can specify a location in the filesystem with either a full name (i.e. /gaia/home/egdaub/Documents/MATLAB), or we can specify a relative location from the current directory (if the current directory is /gaia/home/egdaub/, then we could simply specify Documents/MATLAB). Both are equally valid in Unix.
Because of how Unix commands work, it can be slightly annoying to have files and directories with spaces in their names (spaces usually designate the end of one argument and the start of the next). Many people choose to avoid having spaces in file and directory names, instead using the underscore character _ in place of the space (you may have noticed that I do this with most of my files). You can use spaces in file and directory names, but when entering the name into the Unix command line, you need to put a backslash (\) prior to the space to tell the terminal to interpret that as a space within the path rather than the end of the path. For instance, the path to the directory Drop Box in all of your Public folders must be entered into the terminal as /gaia/home/<username>/Public/Drop\ Box to avoid problems.
We can change our position within the hierarchy using the cd command (short for Current Directory or Change Directory). If we are in our home directory, and want to change to the Documents directory, we enter cd Documents (Unix is case sensitive, so you need to capitalize Documents). Try that, and then use pwd to verify that we are in the Documents folder. Note that we can use either the relative or the full location in the filesystem when using cd.
What if we need to descend a level in the hierarchy? We could type out the full location of the directory one level higher, but if we are very deep in the chain and just want to go up one level, that would be annoying. Instead, we can use .. (two periods) to refer to the directory one level higher. Thus, to change from Documents back to our home directory, we can type cd .. to go up a level. Note that we can combine .. with other directory locations: if I am in Documents and want to enter my Public folder, I can enter cd ../Public and make the change with a single command.
One other thing that is handy when navigating the file hierarchy is ~, which is the same as the home directory. To navigate to your home directory from anywhere, you can type cd ~.
Once we are in the desired directory, how do we see what is in that folder? We use the ls (list) command, which lists all of the contents in the current directory. Try it out – it will print all of the files and directories in the current directory to the terminal, like this (obviously your filenames will be different):
MATLAB                         data_syllabus.synctex.gz
awk                            data_syllabus.tex
ceri7104_dataanalysis.docx     gmt
compexam                       homework
csh                            lectures
data_syllabus.aux              python
data_syllabus.log              sac
data_syllabus.pdf              studentwork
However, you may notice that unless you already know what these files are, the standard ls is not particularly useful. To see more information, enter ls -l to see more information about all of the files, which should print out something like this:
total 472
drwxr-xr-x   53 egdaub  staff    1802 Nov  4  2015 MATLAB
drwxr-xr-x    2 egdaub  staff      68 Aug 10  2015 awk
-rw-r--r--@   1 egdaub  staff  147712 Sep 25  2015 ceri7104_dataanalysis.docx
drwxr-xr-x    3 egdaub  staff     102 Jan  7  2016 compexam
drwxr-xr-x    9 egdaub  staff     306 Dec 17  2015 csh
-rw-r--r--    1 egdaub  staff      84 Aug 25  2015 data_syllabus.aux
-rw-r--r--    1 egdaub  staff    5231 Aug 25  2015 data_syllabus.log
-rw-r--r--@   1 egdaub  staff   52581 Aug 25  2015 data_syllabus.pdf
-rw-r--r--    1 egdaub  staff   15882 Aug 25  2015 data_syllabus.synctex.gz
-rw-r--r--    1 egdaub  staff    4942 Oct 19  2015 data_syllabus.tex
drwxr-xr-x   56 egdaub  staff    1904 Dec 17  2015 gmt
drwxr-xr-x   77 egdaub  staff    2618 Dec  7  2015 homework
drwxr-xr-x  148 egdaub  staff    5032 Nov 24  2015 lectures
drwxr-xr-x   12 egdaub  staff     408 Oct 19  2015 python
drwxr-xr-x   11 egdaub  staff     374 Nov 19  2015 sac
drwxr-xr-x   12 egdaub  staff     408 May  2 12:34 studentwork
This tells us much more about the files and directories in here. The first column tells us several things: the leading d tells us whether or not this item is a directory, and then the remaining r, w, and x items tell us the permissions of a file, which we will discuss in the next lab. The @ is specific to Mac OS, and means that there are additional file attributes that we can view. The second column tells us the number of items in that particular directory or file, and the third and fourth column tells us who owns the file, and the group that that user belongs to (staff). Then we have the size of the item, followed by the date and time when it was last modified, and finally the name. This gives us much more information about the files which could be potentially useful to us.
Why did we get different output that was different in this case for the same command? The addition of the -l to the command, which is an example of a command line option that told the OS that you wanted a particular version of the command (in this case, -l means that you want the “long” version of ls). Many commands have numerous options that you can specify – ls, which is one of the simplest and most used commands in Unix, has almost 40 different options.
ls is not restricted to listing all of the contents in the current directory. If you give ls a file name, it will list that file, or give you a message telling you that file does not exist. While this may not seem useful right now, when we talk about wildcards you will see how this can be a useful tool. Also, you can give ls a directory, and it will list all files in that directory without having to make that your working directory.
As you navigate through the filesystem, you will find a couple of terminal shortcuts to be useful. You can access your command history using the up and down arrows, so if you want to re-enter a previous command, use the up arrow to bring it back into the command window. You can also tab-complete files; if you type part of a file name and then press the tab button, the terminal will complete the file name if there is a unique file that starts with the characters you have typed. If there is not a unique file, then the terminal will complete it as far as it can until it reaches an ambiguity. If you are already at a point where there are more than one possible completions, it will not complete, but if you press tab again, it will bring up all options that match what you have typed so far.
One other command that I use often is Control-u, which deletes everything that you have typed so far in a command. This usually happens to me when I have started a long command, and then realize that I forgot to enter some other command first. Control-u clears all of the text in the command line so that you don’t have to delete the entire string of text manually.
Getting Help
What if you need a specific option among the 40 options within ls but you don’t know what it is? You can read the manual for a Unix command by typing man <command>. For instance, to see all of the options for ls, enter man ls into the command line. You should see a long page describing ls and all of the options. Scroll down with the down arrow (one line at a time), the space bar or “f” key (one page at a time), or back up with the up arrow key (line) or the “b” key (page) to read the documentation. Type “q” to exit the manual page. If you ever do not know how a command works, the manual page is often helpful (though in the spirit of the Unix Philosophy, they can often be rather opaque).
Viewing Text Files
Using cd and ls we have found the directory and file that we are interested in. How do we view the contents of a text file? There are several commands that can be used in the command line to do this.
If you just need to see the first several lines of a file (say you want to double check that the file is what you think it is), you can use the head command. If you have a text file textfile.txt, you can view the first several lines with head textfile.txt. Similarly, if you just want to see the final lines of a file, you can use tail.
What if you want to look at more than just the beginning or end of a text file? You can print the entire file to the screen using cat (short for concatenate). To view the file textfile.txt, enter cat textfile.txt to see the whole file printed out to the terminal.
(One technical note: you may have wondered why a command to print a file’s contents has the name concatenate. This is due to some of the peculiarities of Unix. More generally, cat can take several text files and concatenate them into a single file; here we just give it one file so it concatenates it with itself. cat takes the concatenated file and sends it to what is known as “standard output,” which in this case means that is prints the file contents to the terminal. This is how we can use a command that was designed to concatenate files to simply display a file in the terminal.)
If our file is short, then it does not matter whether we use head, tail, or cat to display a file. However, if our file is very long, then cat will just dump the entire file to the screen, regardless of how long it is. For us, this is not a big deal (we can just scroll up in the terminal window to see the entire file), but for past users of Unix that had a terminal that could not scroll, this would pose a problem as we would only see the end of the file. (Users using the teletype would be able to read the entire printout, but for very long files the file would take a very long time to print, which would be rather annoying). To make looking at files more manageable, Unix has the more command, which prints a file one page at a time. However, more can only scroll forward, so the ironically named less command that allows for both forward and backward scrolling has superseded more (on a Mac if you type more you will actually run less). You can scroll forward page by page with less using the spacebar or the “f” key, or line by line with the arrow key. To go backward, use the up arrow to go line by line or the “b” key to go page by page. Type “q” to exit less.
(The differences between more and less lead to the often repeated Unix joke that less > more, which is supposed to make it easy to remember which command to use.)
One other useful command line tool for learning about files is wc (Word Count). wc can count the number of words, lines, characters, and bytes in a file. Usage is wc <filename1> <filename2> <filename3> ... where the arguments are the names of the files that you wish to evaluate. For example, to see the word count for the file testfile.txt enter wc testfile.txt into the terminal. You can use a number of command line options: -l only counts the number of lines, -w only counts the number of words, -c only counts the number of bytes, -m counts the number of characters, and -L determines the length of the longest line. I often use wc -l to determine the size of an ASCII dataset where each line contains a data item so that I know what to expect when loading the data into MATLAB or some other program.
Editing Text Files
To edit a text file from the terminal, we can edit a text file using a number of different command line editors. While it is certainly possible to edit a text file on a Mac using the TextEdit program, if you are connecting to a Unix system remotely, or need to start your Unix machine in safe mode, the only way you will be able to edit a text file is through an editor. Knowing how to use a terminal-based text editor is an essential Unix skill, and most find that in many cases, a terminal-based text editor is faster and more efficient than an editor like TextEdit.
The Mac OS comes with several Terminal-based text editors: nano (same as pico), vim (same as vi), and emacs, plus possibly more that I do not know about. Most of these editors exist on other Unix systems, and you should be comfortable using one of them. You should also have a basic knowledge of how to use all of them, in case you find yourself on a situation where your favorite editor does not exist on an unfamiliar computer.
If you already know how to use one of these editors, great. You should feel free to use whatever editor you like in this class. (Personally, in my first Unix experiences when I was an undergraduate, I used emacs, and so that is still my editor of choice.) However, it is always a good idea to be able to use several command line text editors. If you have never used any of them, I recommend starting with nano, as it is the simplest and shows you keyboard shortcuts on the screen. If you already are comfortable using one of these editors, I would spend time during the class period practicing with a new editor. There is a built in tutorial for vim that you can access by typing vimtutor into the shell. You can also find tutorials for any text of the text editors using a web search.
Managing Files and Directories
Now that we know how to get around, view, create, and modify text files, we may want to rearrange our files in some way. There are a number of commands to do this.
First, to make a new directory in the present directory, use mkdir followed by the name of the new directory. For example, mkdir ~/Documents/SAC will create a directory name SAC in the Documents folder. You can also do this using the Finder, but it is usually faster to use mkdir.
To copy a file to a new directory, use the cp command (copy). The syntax is cp <file> <newfile>, so to copy the file textfile.txt to the file otherfile.txt type cp textfile.txt otherfile.txt to copy this file. If you want to copy a file to a different directory but keep the same name, you can replace the new file name with an existing directory. If I have a file textfile.txt and wand to place a copy in my MATLAB directory, I would use cp textfile.txt MATLAB (assuming that the MATLAB directory was in the current directory; otherwise I would need to specify the full location of the MATLAB directory). Be warned that if you specify a target file that already exists, the file will be overwritten (often without a warning!).
To move a file to a new location (or rename it in the same location), we use the mv command (move). mv behaves much like cp but the previous version of the file no longer exists after using mv. To rename textfile.txt to samefile.txt I would type mv textfile.txt samefile.txt into the terminal. Again, the same caveat of not overwriting an existing file that applies to cp applies here.
You can delete files with the rm command (remove). You should be very careful with this command, as when you delete a file from the command line it is gone forever (Windows and Mac users will be familiar with the Recycle Bin and Trash, respectively – rm does not send files to these locations). For this reason, it is often suggested to use rm -i instead of rm. rm -i will ask you if you really want to delete the file and require you to type yes or y into a prompt to confirm. This is in general a good idea, and many system administrators make this the default behavior (i.e. when you type rm, the terminal automatically interprets it as rm -i). However, when this is the default behavior, it encourages people to be lazy with their responses (automatically typing y for a large number of files) or lazy in using wildcards to select files to delete knowing that there will be a chance to use a prompt to prevent deletion. For this reason, I try to just avoid using rm as much as possible from the command line and delete things from the Finder so that they go in the Trash rather than being deleted forever. This same -i option is available for mv and cp in the event that you try to overwrite an existing file using those commands.
Finally, to remove a directory use rmdir followed by the directory name. The directory must be empty before you remove it. There is a way to remove a directory that is not empty using rm, though it can be dangerous if it is mistyped because if you accidentally specify a directory high in the hierarchy, you can delete your entire home directory (and if you have administrative privileges, you could potentially delete the whole file system!). My preference here is also to delete things from within the Finder so that I can retrieve things from the Trash if I make a mistake.
Summary
Here are a list of the commands that we introduced in this lab. They are among the most common, and you will likely find yourself using them very often:
pwdlscd..(directory one level higher)~(home directory)manheadtailcatless(same asmore)wcnanovimemacsmkdircpmvrmrmdir